Showing posts with label Holiday Craft. Show all posts

Wednesday, December 21, 2016

My New Christmas Wreath

Here is my new Christmas wreath!
It's made out of red burlap, a straw wreath (I recommend using foam instead) and greening pins (I recommend using just regular boutonniere pins....see tutorial I followed below).


The red and blue really go great with our mantel color story.

Here's my inspiration tutorial found over at Find It, Make it, Love it.

I had a different tutorial I was using when I purchased my supplies. Then I stumbled upon this tutorial and wish I'd found it first. It has really great step by step photos. So great, I didn't even bother taking step by step pics of my own. Just go check out her tutorial!

It all started with this red burlap that I purchased on-line about 5-6 years ago (about 1 yard). I knew I wanted to do something Christmasy with it but didn't know what. Our wreath got damaged last year so I tossed it, so our mantel needed one desperately.

The straw wreath was 12 inches and really hard to stick those greening pins into, especially after a few overlapping layers of burlap.

It took me about an hour from start to finish but I used a rotary cutter like she did to cut my squares. If I was cutting them all individually, I could see how it would take longer.

For my bow, I wanted the contrast of the shimmery blue against the rough, red burlap. It had wire edging, so even though I've never tied a bow in my life, it was pretty easy. Here's a good bow tutorial for bow tying over at Skip to my Lou.


I had enough burlap squares left over, I plan on making a banner to hang on the shutter on the mantel. That will probably be my next project.


Monday, December 19, 2016

Christmas Card Holder

Meet my new Christmas card holder!

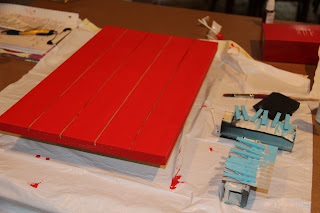
I bought this slat board over at The Wood Connection about 5 or 6 years ago. I never really knew what I wanted to do with it, so I put it in my craft closet and forgot about it.

 So yesterday, I decided to finally do something with it.

After I searched Pinterest for pallet board ideas, I came across this one from
Once Upon a Vinyl by Liv....a Christmas card holder. My old Christmas card holder broke, so I needed a new one!
I love the title Merry Mail and the rustic feel of it.
So I got my fuel ready...Diet Dr. Pepper from Sonic.

I was determined to use what I had on hand, #1 because I didn't want to get out in the sub Arctic temperatures, #2 my daughter is sick and I didn't want to be away from her for too long (me in a craft store can take a while, and #3, it's more of a challenge.

I had red acrylic paint, turquoise acrylic paint (only a little), mini-clothes pins and twine. So I started by giving both the board and pins 2 coats of paint.


I could have hand lettered the words Merry Mail or used vinyl letters but I wanted this to be quick (I have more crafts to do after all),so I'm going to show you a little trick I use in my art room to transfer your practice to the real paper. It's called chalk or graphite transfer. Any type of chalk or graphite will work. I wouldn't use anything waxy.
First, I printed Merry Mail on my inkjet printer in one of my favorite fonts, Pea Ellie Bellie (a free one).

Next, I found some chalk on our menu board in the kitchen and colored on the backside of the words.


I taped the paper in place and used a pencil to outline each letter.

Take off the paper and left behind is a chalk outline of each letter.


I used a white gel pen to outline each letter. Then I used the same pen to add some hatching inside each letter.

Let the ink dry. No really...let it dry overnight. Once dry, use a damp cloth to get rid of any extra chalk.


 Then I took the twine and used my staple gun to tack it in place on the back.


Add the clothespins.

Then add the Christmas cards.

It doesn't hold very many, but I'm going to trade the cards out as we get more.
Thanks for the inspiration, Once Upon a Vinyl by Liv

Wednesday, June 8, 2016

Father's Day Card Tutorial


Here's a tutorial I made from 2 years ago for a cute Father's Day Card.


And don't forget to visit my Etsy Shop, Kaminski's Creations.
Use coupon code FREESHIP2016 to receive free shipping on all orders.

Sunday, June 1, 2014

Father's Day Card

 
Check out my Father's Day Card from last year! Simple and easy!
 
I wanted to make Russell a special Father's Day Card from Sophia and since they both LOVE their Super Hero's, I knew exactly what I wanted to make....a card fit for a Super Hero.
 
I started with a double sided piece of scrapbook paper measuring 10 x 7. Then I folded both sides to meet in the middle. Next I cut out a tie to add to the front.
 

I bent down the corners to look like a collar and glued a few buttons down the middle as well.

I found a dark denim paper and glued it in the middle to have a solid background (measuring 5 x 7).

I glued the tie on the front, left side.

 
I used my Superman Cricut cartridge to cut out the Superman emblem and my Mickey Mouse cartridge to cut out the letters.
Now Sophia just needs to sign it!


Linking Up With These Great Blogs:

Alderberry Hill,      Tutus and Tea Parties,      The Rustic Pig Designs,      Or So She Says,      My 1929 Charmer,      Super Handmade Sunday @ A Cat- Like Curiosity,      Lil' Luna          Craft Geek,      Simple As That,       House on the Way,      Sassy Sites,      Mindy May's Market,   Skip To My Lou,        Sugar Bee Crafts,      Cheap Crafty Mama,      Be Different, Act Normal,   Homemaker In Heels,     The Busy Bee's,      Fireflies and Jellybeans,    The Shabby Creek Cottage,     30 Handmade Days,     52 Mantels,     The Shabby Nest,     Lovely Crafty Home,  See Vanessa Craft,     Blissful Bucket List,     Bacon Time With The Hungry Hypo,     Lena B, Actually,     Pocket Full of Pink,     Family Ever After,      I Heart Naptime,     Six Sisters Stuff,  Nifty Thrifty Things,     Homemaker on a Dime,     Under The Table and Dreaming,     Flamingo Toes,    It's Overflowing,    Ivy And Elephants,    Clean and Scentsible,    Creations by Kara,     Tip Junkie,      Love and Laundry,      Create. Craft. Love.,     Sarah Dawn Designs,     One Artsy Mama,      Tatertots and Jello,     The Grant Life,     The Hubby Made Me,     Kitchen Fun With My Three Sons,       The Chiffon Diary,     Manic Mother,     The Thriftiness Miss,     Say Not Sweet Anne,     Becoming Martha,     Too Much Time On My Hands,     Destination Craft,     The Dedicated House,      Katherine's Corner,   C.R.A.F.T.,    Fluster Buster,     Nap Time CreationsThe Mandatory MoochLamberts Lately