Monday, December 26, 2016

Joy Banner

Here's my new Joy banner that I made today using leftover scraps of the red burlap from my wreath. 


Lay freezer paper on your Cricut mat and send it through your Cricut machine.


I made a little mark with chalk where I wanted the bottom of letters to go.


Iron for a couple of minutes.


Add acrylic paint. I used white.

Let it dry. Mine was not completely dry when I removed the freezer paper.

I attached my banner to jute using glue.

I staple gunned it to my shutter.
Viola. Easy banner.

Wednesday, December 21, 2016

My New Christmas Wreath

Here is my new Christmas wreath!
It's made out of red burlap, a straw wreath (I recommend using foam instead) and greening pins (I recommend using just regular boutonniere pins....see tutorial I followed below).


The red and blue really go great with our mantel color story.

Here's my inspiration tutorial found over at Find It, Make it, Love it.

I had a different tutorial I was using when I purchased my supplies. Then I stumbled upon this tutorial and wish I'd found it first. It has really great step by step photos. So great, I didn't even bother taking step by step pics of my own. Just go check out her tutorial!

It all started with this red burlap that I purchased on-line about 5-6 years ago (about 1 yard). I knew I wanted to do something Christmasy with it but didn't know what. Our wreath got damaged last year so I tossed it, so our mantel needed one desperately.

The straw wreath was 12 inches and really hard to stick those greening pins into, especially after a few overlapping layers of burlap.

It took me about an hour from start to finish but I used a rotary cutter like she did to cut my squares. If I was cutting them all individually, I could see how it would take longer.

For my bow, I wanted the contrast of the shimmery blue against the rough, red burlap. It had wire edging, so even though I've never tied a bow in my life, it was pretty easy. Here's a good bow tutorial for bow tying over at Skip to my Lou.


I had enough burlap squares left over, I plan on making a banner to hang on the shutter on the mantel. That will probably be my next project.


Monday, December 19, 2016

Christmas Card Holder

Meet my new Christmas card holder!

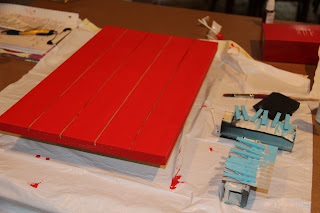
I bought this slat board over at The Wood Connection about 5 or 6 years ago. I never really knew what I wanted to do with it, so I put it in my craft closet and forgot about it.

 So yesterday, I decided to finally do something with it.

After I searched Pinterest for pallet board ideas, I came across this one from
Once Upon a Vinyl by Liv....a Christmas card holder. My old Christmas card holder broke, so I needed a new one!
I love the title Merry Mail and the rustic feel of it.
So I got my fuel ready...Diet Dr. Pepper from Sonic.

I was determined to use what I had on hand, #1 because I didn't want to get out in the sub Arctic temperatures, #2 my daughter is sick and I didn't want to be away from her for too long (me in a craft store can take a while, and #3, it's more of a challenge.

I had red acrylic paint, turquoise acrylic paint (only a little), mini-clothes pins and twine. So I started by giving both the board and pins 2 coats of paint.


I could have hand lettered the words Merry Mail or used vinyl letters but I wanted this to be quick (I have more crafts to do after all),so I'm going to show you a little trick I use in my art room to transfer your practice to the real paper. It's called chalk or graphite transfer. Any type of chalk or graphite will work. I wouldn't use anything waxy.
First, I printed Merry Mail on my inkjet printer in one of my favorite fonts, Pea Ellie Bellie (a free one).

Next, I found some chalk on our menu board in the kitchen and colored on the backside of the words.


I taped the paper in place and used a pencil to outline each letter.

Take off the paper and left behind is a chalk outline of each letter.


I used a white gel pen to outline each letter. Then I used the same pen to add some hatching inside each letter.

Let the ink dry. No really...let it dry overnight. Once dry, use a damp cloth to get rid of any extra chalk.


 Then I took the twine and used my staple gun to tack it in place on the back.


Add the clothespins.

Then add the Christmas cards.

It doesn't hold very many, but I'm going to trade the cards out as we get more.
Thanks for the inspiration, Once Upon a Vinyl by Liv

Sunday, December 18, 2016

Time for Crafting Inspirations

I started these aprons and towels back in October, hoping to have them in my Etsy Shop by Christmas. Well....that didn't happen. I kept procrastinating. And now I've missed the Christmas shopping season. I had so much fun picking out the fabrics but when it came to actually sitting down to sew, I was just not motivated.

Here's my sewing room, a.k.a, the formal dining room.


I even had some really cute patterns to use.

So, I decided to put it all away, take a break from these projects for my shop and refocus on crafting and artsy fartsy-ing for fun. For my own creative sanity. I realized that about 5 years ago, when I started my shop, all my creative focus has been on my Etsy shop and not on creating art for fun.
About 6 or 7 years ago, when I started crafting, I started going on line and getting really good deals at scrapbook shops on supplies......some I've never even used (like this Cricut cartridge).
Or this board....

and these frames....

these distressing inks (I wonder if they even still work)....

....sticky backed canvas sheets....


...foil sheets, stencil sheets (you can create your own stencils using your Cricut to cut it!!!)....

And this packet of papers and burlap....speaking of burlap...I need to go pull out my red burlap I haven't looked at in 6 years.

So you see, these supplies are begging to be used. And I'm answering the call. I'm putting my creative needs first.
Now, to go get sucked in to Pinterest for inspiration. Follow me on Pinterest to see what's inspiring me (my board called Crafty Inspirations).

So many possibilities!!!!