I was very inspired by my friends launch pad blog post at Next to Heaven. I really the whole dry erase concept and that it's all in one place.
So my newest project (which will be in pieces and involve me getting my husband to hang it for me, so it may take a while to see the finished project) is a "Command Center" the kitchen to have a menu board, a calendar, a place to sort the mail and hang important invitations, reminders etc.
So my first piece of this project is a magnetic board to hang invitations we get, reminders, Sophia's school calendar etc.
I started out with this broken mirror I found at Canton that I bought for a dollar. I spray painted the frame black and then removed the backing (the tan piece in the middle) and painted it with magnetic paint. Now let me tell you. Do NOT skimp on the magnetic paint. I started out using the Krylon spray paint version. Not very magnetic. Then I used the Martha Stewart product I found at Joann's. Hardly worked. Then I bought the $20 can of magnetic paint primer from Home Depot and it rocks! It was totally worth the $. Plus I only used about 1/16 of the can, so I see some magnetic boards in my future.
Then I found a scrap remnant and sprayed the magnetic side of the backing with a sticky adhesive. I cut out around the board.
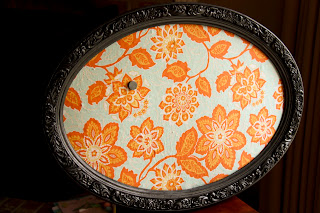
And installed it in the frame.
See the magnet on the left? Totally hanging tight.
The most expensive thing about this project was the magnetic paint. But I think it was totally worth it.
Linking up with It's Just Called Spicy,The Shabby Nest, Under The Table and Dreaming and The Shabby Creek Cottage


15 comments:
Beautiful and fuctional!! Just darling... I wish we were closer and could split that can of paint :)
That is adorable, I must say I did't know you could get magnetic paint. Thanks for the tip.
Just found you through It's just called Spicy's link-up. So cute! I didn't even know there was such a thing as magnetic paint, but now that I now, I think I might go crazy with that knowledge (watch out...you might have to take off your jewelry before coming in my house once I've made everything magnetic!)
Hi! Visiting from tt&j! What an awesome message board! I love the fabric that you used! And thanks for the tip on magnetic paint.. I havent used it yet but Ill keep this in mind!
If you get a chance I would love for you to share this (and any other awesome post you have) at my Friday link party!
http://www.thegrantlife.com/2012/08/financial-friday-fabulous-features.html
Oh, how cute is that! Thank you for sharing. Visiting from Blissful Bucket List. Would love it if you would share this at my Make it Pretty Monday party at The Dedicated House. http://thededicatedhouse.blogspot.com/2012/08/make-it-pretty-monday-week-9.html Hope to see you at the bash! Toodles, Kathryn @TheDedicatedHouse
I have been wanting to try this but heard that the magnetic paint was a dud, thanks for sharing which one actually works! Beautiful project!
easy and cute!
http://www.lighttrigger.net/2012/08/diy-almofada.html
Cute! I love the print in the back of the board. Stopping by from a blog hop, feel free to stop by!
www.iheartpears.blogspot.com
Love this! The fabric is so pretty :) Thanks so much for sharing this at our Weekend Wonders party! We hope to see you back again on Thursday :) Have a great week!
this is so smart! and i love the fabric you used too...
so what brand of magnetic paint did you actually use? so we will learn from you :)
huggies ***
smart momma
I used Rustoleum Magnetic Primer. I've seen it at Home Depot and Walmart but not any craft stores.
This is beautiful! I absolutely love that fabric. I would love for you to link up to our Pinteresting Link Party http://herestohandyandy.blogspot.com/2012/08/a-pinteresting-link-party-week-53.html
I love the color and print of your fabric and how you did it so inexpensively. I love boards--bulletin, magnetic, cork, all of them! :) I pinned your great creation to my "organization for the family" board.
Love it I am so going to make one!! Love the fabric as well. dropping by from Pinteresting party.
I love it! The fabric is lovely too! Thank you for sharing at our
Pinteresting Party!
Post a Comment