Showing posts with label Found Object Recycling/Repurposing. Show all posts

Thursday, June 9, 2016

Keepsake Suitcase

This is one of my all time favorite projects. You'll need a suitcase, paint, paper, glue and a ton of memories! Here the link for the complete tutorial Keepsake Suitcase. If you're looking to find a creative way to use a suitcase or to just treasure your child, this is the perfect labor of love.
I refurbished this old suitcase for free into a keepsake suitcase that I can give my daughter when she walks out that door for college.

Wednesday, July 16, 2014

My "Quotes" Journal

I'm a lover a good quote and after rereading my More Series books and her newest one available on Amazon, I was inspired to create a quotes journal because Jay McLean just had so many quotables and having it in my Kindle notes wasn't enough. So go read her series! It will inspire you too! Start with More Than This.
 
So back to my journal.....here's the finished product. 
But it start out as this old school memo book that we've all seen (at least in America). Once back to school supplies shopping begins, I can find them for 99 cents.

My daughter hijacked this one before I could beautify it.

So it went from that to this by wrapping it in scrapbook paper.

You need 2 pieces of 12 x 12 paper that you will cut down to 9 3/4 x 12 (measure the journal 1st, that's just what mine measured as).
Those are used to wrap around the cover. As you can see I had to add strips of coordinating paper to cover the rest because the paper wasn't big enough.
 
For those strips of paper, I cut a 2x 9 3/4 for the outside and 3 x 9 3/4 for the inside. I repeated the same for the back cover.
 
Then I found the cool chalkboard stickers to use as labels. One even had a cute little Jaybird on it. And they really do work but, I had thicker chalk and it just didn't look pretty. So I used white paint pen. I'm going to look for skinny chalk the next time I'm out.

I love this scrapbook paper. It's called Be You by Fancy Pants. This page is all one print. I didn't cut and layer those strips. But it has quotes about being you, being in the moment etc.


Then I added a little washi tape with the alphabet (found in the scrapbook section of a craft store). It comes in tons of different patterns.


Then I added some red ribbon with glue.

I used a little baker's twine to wrap around the front a couple of times to tie on these charms.

I added a mini clothespin to keep my place.
And this is what I ended up with.
*** All measurements given are in inches.***

Saturday, December 28, 2013

Recipe Boxes

I was trying to think of other ideas to add to my kitchen collections and when I saw several plain wooden boxes at Target, I knew exactly what I wanted to make....recipe boxes. Pair it with a set of my kitchen tea towels and they make the perfect wedding or housewarming gift.
 
So I just spray painted them (one blue and one brown). I used my E6000 glue to attach an old spoon and old fork to the front.
 

Then I made the recipe cards using a recipe card stamp and a journal stamp. The recipe cards are made from double sided scrapbook paper. I printed the stamps on solid papers that coordinated with the patterned papers and glued one side that has the recipe stamp and the other side has the journal paper for notes or extra space for the recipe.


Here's the brown box.


The blue one has already sold but if I find anymore of these boxes, I'll be making more.

Friday, December 27, 2013

Let's Get Organized!

For those of you that don't know, I'd planned on having a booth at the L.D. Bell Craft Fair the first weekend in December. I've done it twice before with lackluster results. But thought, maybe this was my year. My friend let me share her booth space and it was a prime spot. Unfortunately, a HUGE ice storm hit us around that same time. We were out from school 2 days and the craft fair was canceled. Boo! Not postponed. Boo! Just canceled. Boooooo!
 
So a few of the bigger items I'd made will eventually make it to my shop but shipping costs may prohibit that. Wondering if my consignment friends would like me to send them there??
 
So now on to the post......
A great way to keep your family organized for the next year is a menu board. You log what you'll be serving. Everyone knows what to expect. Plus, you commit yourself to actually making it. Putting it in writing makes it more of a commitment.
 
The first chalkboard menu board I made I framed in wine corks.

Yes, they are authentic and have been removed from an actual bottle of wine.

The back looks like this. Just in case you get tired of being organized or need a break. It hangs by a twine rope that my husband drilled holes for. I tied knots in one side (the menu side) and it loops around the back.

The 2nd menu board is also chalkboard but with dining utensils as a frame. All I did was buy old utensils and spray paint them a robin's egg blue.

I glued them on with E 6000.

I decorated the back, just in case you get bored with menu planning.....
 
My 3rd menu board is a dry erase board. I used an old frame that I spray painted black. Behind the glass I did an arrangement of papers that are super retro and fun! All you have to do is buy a dry erase marker and write on top of the glass. Erase each week with a paper towel and rewrite.

 
Linking Up With These Great Blogs:

Alderberry Hill,      Tutus and Tea Parties,      The Rustic Pig Designs,      Or So She Says,      My 1929 Charmer,      Super Handmade Sunday @ A Cat- Like Curiosity,      Lil' Luna          Craft Geek,      Simple As That,       House on the Way,      Sassy Sites,      Mindy May's Market,   Skip To My Lou,        Sugar Bee Crafts,      Cheap Crafty Mama,      Be Different, Act Normal,   Homemaker In Heels,     The Busy Bee's,      Fireflies and Jellybeans,    The Shabby Creek Cottage,     30 Handmade Days,     52 Mantels,     The Shabby Nest,     Lovely Crafty Home,  See Vanessa Craft,     Blissful Bucket List,     Bacon Time With The Hungry Hypo,     Lena B, Actually,     Pocket Full of Pink,     Family Ever After,      I Heart Naptime,     Six Sisters Stuff,  Nifty Thrifty Things,     Homemaker on a Dime,     Under The Table and Dreaming,     Flamingo Toes,    It's Overflowing,    Ivy And Elephants,    Clean and Scentsible,    Creations by Kara,     Tip Junkie,      Love and Laundry,      Create. Craft. Love.,     Sarah Dawn Designs,     One Artsy Mama,      Tatertots and Jello,     The Grant Life,     The Hubby Made Me,     Kitchen Fun With My Three Sons,       The Chiffon Diary,     Manic Mother,     The Thriftiness Miss,     Say Not Sweet Anne,     Becoming Martha,     Too Much Time On My Hands,     Destination Craft,     The Dedicated House,      Katherine's Corner,   C.R.A.F.T.,    Fluster Buster,     Nap Time CreationsThe Mandatory MoochLamberts Lately, Made From Pinterest


Monday, August 12, 2013

Washi Tape Birdhouse

I bought this plain white bird house at Joann's on clearance. I always love a good bargain! It sat in my craft closet forever because I just couldn't decide what I wanted to do with it.
 
 As part of a craft contest, I decided washi tape would be perfect to add a little color and pattern to it.


I chose a bright red, geometric patterned tape.

You just have to make sure you line up the patterns (much like sewing).

For contrast, I used a teal damask patterned tape.

But it didn't seem quite finished. So I added a black polka dot tape.
 

I love how just adding a little washi tape can transform a boring birdhouse. Another great thing is that if I decide I want to change colors, the washi tape can be easily removed and replaced.

Linking Up With These Great Blogs:

Alderberry Hill,      Tutus and Tea Parties,      The Rustic Pig Designs,      Or So She Says,      My 1929 Charmer,      Super Handmade Sunday @ A Cat- Like Curiosity,      Lil' Luna          Craft Geek,      Simple As That,       House on the Way,      Sassy Sites,      Mindy May's Market,   Skip To My Lou,        Sugar Bee Crafts,      Cheap Crafty Mama,      Be Different, Act Normal,   Homemaker In Heels,     The Busy Bee's,      Fireflies and Jellybeans,    The Shabby Creek Cottage,     30 Handmade Days,     52 Mantels,     The Shabby Nest,     Lovely Crafty Home,  See Vanessa Craft,     Blissful Bucket List,     Bacon Time With The Hungry Hypo,     Lena B, Actually,     Pocket Full of Pink,     Family Ever After,      I Heart Naptime,     Six Sisters Stuff,  Nifty Thrifty Things,     Homemaker on a Dime,     Under The Table and Dreaming,     Flamingo Toes,    It's Overflowing,    Ivy And Elephants,    Clean and Scentsible,    Creations by Kara,     Tip Junkie,      Love and Laundry,      Create. Craft. Love.,     Sarah Dawn Designs,     One Artsy Mama,      Tatertots and Jello,     The Grant Life,     The Hubby Made Me,     Kitchen Fun With My Three Sons,       The Chiffon Diary,     Manic Mother,     The Thriftiness Miss,     Say Not Sweet Anne,     Becoming Martha,     Too Much Time On My Hands,     Destination Craft,     The Dedicated House,      Katherine's Corner,   C.R.A.F.T.,    Fluster Buster,     Nap Time CreationsThe Mandatory MoochLamberts Lately

Friday, June 21, 2013

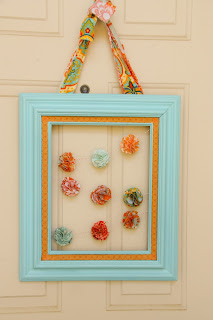
Spring/Summer "Wreath"

I say wreath because it's hanging in the same spot I normally put my wreaths (on the inside of our front door). But this is not circular...at all.
 
 I took an old Goodwill frame and spray painted it turquoise.
 
I added some washi tape on top of the "crunchy bits" around the frame.


Then I made pom-pom's via blogs (Cup of Delight and The Little Things). Both of these had great tutorials with lots of great step by step photos.

Then I strung up the pom-pom's on twine and practiced how I wanted them to hang using tape.


Eventually, once I figured out the pattern I wanted, I used a hot glue gun and staple gun to secure them.


Then I used fabric strips to create a way to hang it on my wreath door hanger.


Think I'm safe until Fall!
 
Linking Up With These Great Blogs:

Alderberry Hill,      Tutus and Tea Parties,      The Rustic Pig Designs,      Or So She Says,      My 1929 Charmer,      Super Handmade Sunday @ A Cat- Like Curiosity,      Lil' Luna          Craft Geek,      Simple As That,       House on the Way,      Sassy Sites,      Mindy May's Market,   Skip To My Lou,        Sugar Bee Crafts,      Cheap Crafty Mama,      Be Different, Act Normal,   Homemaker In Heels,     The Busy Bee's,      Fireflies and Jellybeans,    The Shabby Creek Cottage,     30 Handmade Days,     52 Mantels,     The Shabby Nest,     Lovely Crafty Home,  See Vanessa Craft,     Blissful Bucket List,     Bacon Time With The Hungry Hypo,     Lena B, Actually,     Pocket Full of Pink,     Family Ever After,      I Heart Naptime,     Six Sisters Stuff,  Nifty Thrifty Things,     Homemaker on a Dime,     Under The Table and Dreaming,     Flamingo Toes,    It's Overflowing,    Ivy And Elephants,    Clean and Scentsible,    Creations by Kara,     Tip Junkie,      Love and Laundry,      Create. Craft. Love.,     Sarah Dawn Designs,     One Artsy Mama,      Tatertots and Jello,     The Grant Life,     The Hubby Made Me,     Kitchen Fun With My Three Sons,       The Chiffon Diary,     Manic Mother,     The Thriftiness Miss,     Say Not Sweet Anne,     Becoming Martha,     Too Much Time On My Hands,     Destination Craft,     The Dedicated House,      Katherine's Corner,   C.R.A.F.T.,    Fluster Buster,     Nap Time CreationsThe Mandatory MoochLamberts Lately