Friday, December 30, 2011

Procrastination.....sigh....

What have I done creatively, lately? Procrastinating, that's what. I got everything set up to work on a gratitude book and just couldn't get started. 
I think the problem is that I decided to hand stamp each day, so that means 365 stamps, well, plus some if you count each double and triple digit numeral. What was I thinking???? I'd decided this route because the sticker method was bankrupting my craft bank. I think if I sell these in my shop, I will have to just leave the pages blank.


I need a craft room! Not to keep Sophia out of my stuff (cause believe it or not, she doesn't mess with it). But just so I can leave everything out, close the door and hide the chaos. 


I'm on # 127 I think....it WILL be finished by tomorrow. I promise Tri!

Saturday, December 24, 2011

Our Christmas Card

Merry Christmas from our family to yours!

Above is our Christmas card that I designed using Photoshop and digital scrapbooking elements. If you haven't ever tried to use Photoshop to create digital scrapbook pages (I usually do it for special gifts that I want multiple copies of, like gifts for the grandparents), check out The Shabby Princess Tutorials. They have video tutorials that you can pause and play as you create your own layouts. And they have free super, cute downloads as well as ones you can purchase. The one above, I purchased.

Saturday, December 10, 2011

Christmas Pillow Covers

Here's a mini-tutorial on how to sew an edging on a pillow cover. Mini because I just forget to take pics of each step. So I'll apologize now for any missing steps.

For the Grinch pillow I made, I cut 1 piece of 19 x 19 fabric, for the front. Then I cut a 2   12x 19 pieces for the back ( I used plain red fabric since the Grinch fabric is kind of more expensive.
Then I layered this pom-pom fringe around the edge of the pillow. Pin it into place. Make sure the straight edge is pinned against the edge (and make sure the right side of the fabric is facing up. The pom-poms should be farther away from the edge. Sew it on. Then I layed 1 piece of my backside fabric on TOP of the Grinch/w pom-pom piece, right sides together. Sew it on. Do the same with the other back piece.


Then I decided I wanted to make a pleated pillow cover.

I cut about 6 or 7 (36 inch long strips x 5 inches wide). I pinned all the strips together, end to end.

See. Here is where I sewed the right sides together. And I just repeated that step, for each strip of fabric to get 1 really long strip of fabric.


Then I flattened each seam.


Then I folded the super long strip in half in half and ironed it.

 Then I started to lay the "edging" along the edge of the pillow. Just make sure the right side (the good side) of the fabric is facing up. Some fabrics it doesn't matter, obviously with this green fabric it didn't. ALSO, make sure the open edge of the edging is lining up with the edge of the fabric (in this case, the green fabric). You always want the "bad" edge of whatever fringe you choose , to be touching the edge of the right (good) side of the edge of the fabric. Whether it's pom-poms, fringe, or whatever. Clear as mud?


To do a pleat, lay down the fabric edge and then fold up a little, lay flat, fold up etc.
I pinned as I went. 

The Corners.....

I totally messed up my pleated corners. I should have folded over extra around the corner (I need to post a tutorial on that when I get it figured out). 


Once I finally made it around to the end, I opened up the  edge of my strip.....

And tucked  in the edge, so it looked more finished, 
Here's the final pillow.

Then I layed one back piece on top of the right side of the pillow.

Lay on the second back piece.


It works better if you flip over your project and work from the opposite side. 


Here's the finished product. Let me know if you want a tutorial on how to create the Christmas Tree applique pillow. It was the same technique I used on my daughter's birthday shirt , here Appliqued T-Shirt Tutorial. I just layered different fabrics using Heat N Bond.


I have a few more sewing projects to finish before the end of the week. I hope I can get them all done. Christmas is coming up quick.

Saturday, December 3, 2011

Christmas Trees

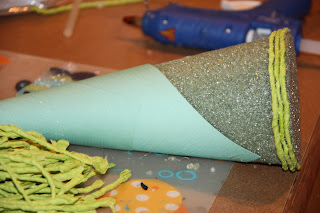
Thanksgiving weekend, I decided to try to make the trees I've been seeing all over Pinterest. All I could find were Styrofoam tree forms. I wrapped them with paper to create more of a point at the top and to match the color of the tissue paper I was using. 
I started with the lime green tissue paper first. I cut it into 1 1/2 inch strips and twisted them into long rope-like pieces. I didn't have any lime green paper, so I just used a light blue. Using my hot glue gun, I glued each rope-like piece on, one by one. The blog where I read how to do this wasn't lying when she said this was time consuming.


Don't worry, when the tree is on the mantle, you can't see the blue paper through the tissue paper.

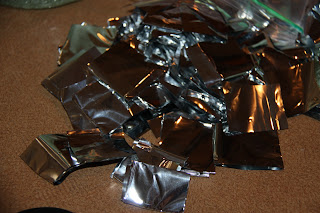
I also made one using 1 x 1 inch squares of tissue paper. The tissue paper I found was a metallic shiny finish, almost like Mylar. I got it at Target. Using a pencil, I wrapped the square around the eraser end of the pencil and twisted it a little. Then I hot glued it on. 


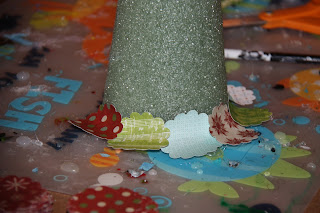
The next tree I made was one where I cut a million individual shapes using a punch. It was the scalloped circle punch by Fiskars. 

Then I glue on each piece.


I used a pencil to wrap each piece to give it that curve. Towards the top, I had to cut the scallop shapes down, as the full scallops were too big to fit.

Here's my finished trees!


And the completed mantle!


And the Christmas cards have started to arrive for our Christmas card holder!